Table of contents:
If you’ve landed on this article, you either have an interest in interactive livestreaming, or you’re a brand new Livery customer trying to host your first stream. If you aren’t sure exactly what equipment you’ll need to get your first stream off the ground, you’re in the right place. In this article, we’ll cover the four basic configuration options to help you choose which setup is right for you. After the basics, we’ll touch on our equipment recommendations (including optional add-ons) to make it just right. Let’s dive in.
If you’re short on time, here’s the bottom line:
Investments in a quality camera, microphone, and lighting go a long way for creating professional quality video and sound, but you don’t need to purchase anything if you don’t want to. You probably already have everything you need to get started with Livery now.
What is a livestream studio? How to set up the physical environment
A livestream studio, put simply, is a curated environment you stream from. For some streamers, it’s a space within their home dedicated to streaming. For others, it’s a room carved out of office space. Regardless of where it is, before you consider equipment, a basic studio environment should have:
- A door/method of ensuring you won’t be interrupted mid-stream.
- Some sort of soundproofing (from full soundproof foam panels to adding fleece blankets/carpets/curtains) – anything that can absorb unwanted noise and echoes will help.
- Nice lighting (natural or artificial will work, but more on this later).
- A pleasant background (for example, a plain or feature wall, nicely decorated shelving, on-brand decor or art, etc.).
- A strong internet connection.
Once you’ve decided on your streaming studio space and have the physical environment set up how you’d like it, it’s time to fill it in with the equipment you need to share it around the world. Here are four beginner options for your equipment configuration:
How to choose the right equipment: 4 livestream studio setup options
If you aren’t sure where to start, let’s look at what you already have and work from there. You can always add more to your setup over time – don’t let a lack of equipment stop you before you start.
In this section, we’ll break down four entry-level format productions. As you get further into the article, the production value (and relative complexity/equipment requirements) will go up.
Here are the four basic equipment setup options:
- Mobile studio
- Basic single cam studio
- Basic multicam studio
- Professional multicam studio
Let’s dive into each of them.
Mobile livestream studio
Streaming only
The simplest of all production configurations requires nothing but a smart phone, tablet, or laptop. In this setup, your mobile device is used as both the camera and streaming device. That’s it!
Advantages to this setup (besides the obvious bonus that you don’t need to purchase any equipment) also include the fact that you can set up and start a live stream within seconds from any location in the world. To get started, make sure you have access to a stable Wi-Fi connection or a 4G (or better) mobile network.
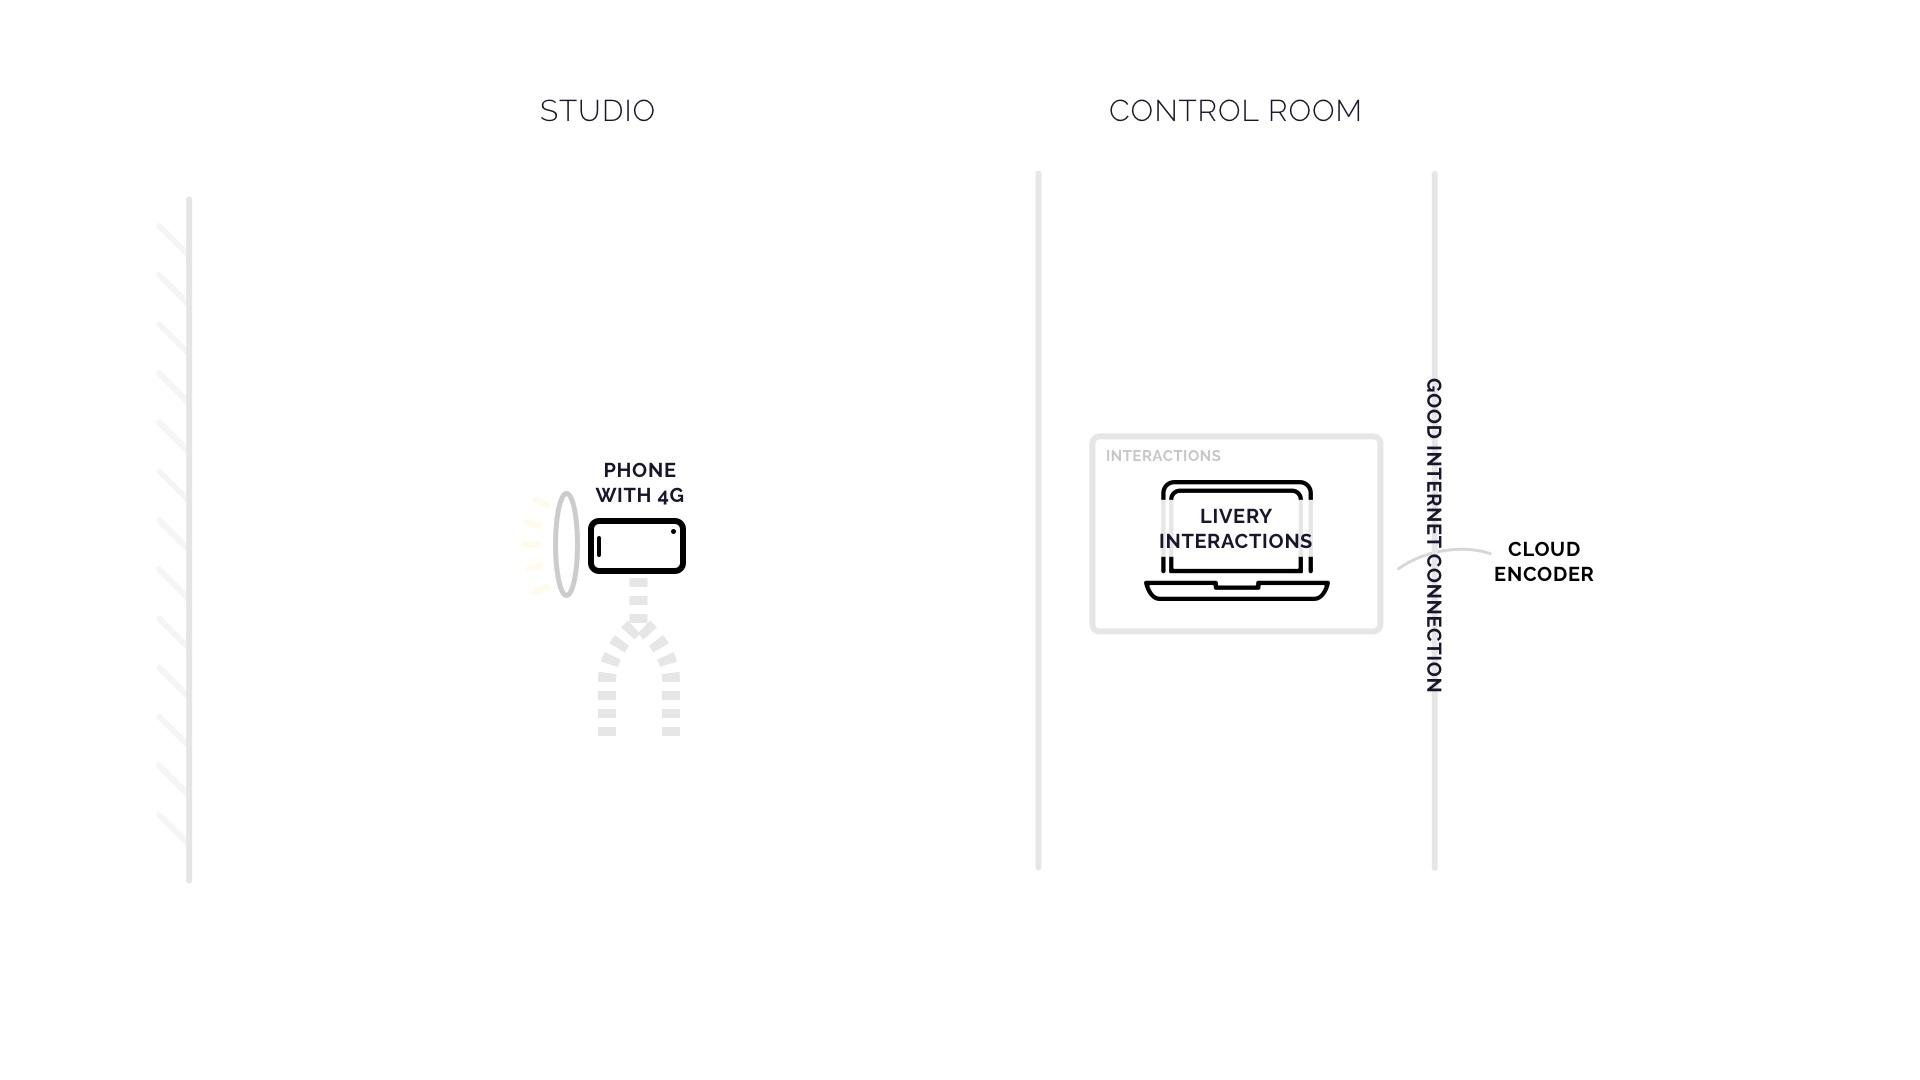
Streaming + interactivity
If you want to add interactivity to your mobile stream, you’ll need to add a laptop to your setup. With the internet browser on your laptop, navigate to Livery Interactive to control the interactions while hosting the video stream from your phone.
You do not need a full studio configuration to stream with Livery: go mobile from any location in the world!
Use cases for a mobile studio
- Live reporter
- Webinar
- Online trivia/gaming
- Influencer vlog
- Influencer shop
- And more
Click here to see the set up of a mobile livestream studio
Basic single-camera studio
A basic single-cam setup is a perfect choice if you want to step it up a notch without taking on an overwhelming investment. Until you’re comfortable streaming, it’s better to under-invest now and add more equipment later, than to invest in a lot of upfront equipment that you end up not using.
At the core of this equipment configuration, you’ll need a high-quality camera that you can attach to an internet-connected computer and (optional) microphone.
With this simple but robust configuration, you can start streaming your live productions immediately at a higher video quality than a built-in laptop or smartphone camera can offer (without investing thousands into your setup).
Use cases for a single-cam setup
- Webinar
- Press conference
- All-hands
- Q&A
- Online trivia / gaming
- Training
- Vlog
- And more
Click here to see the set up a single-cam livestream studio
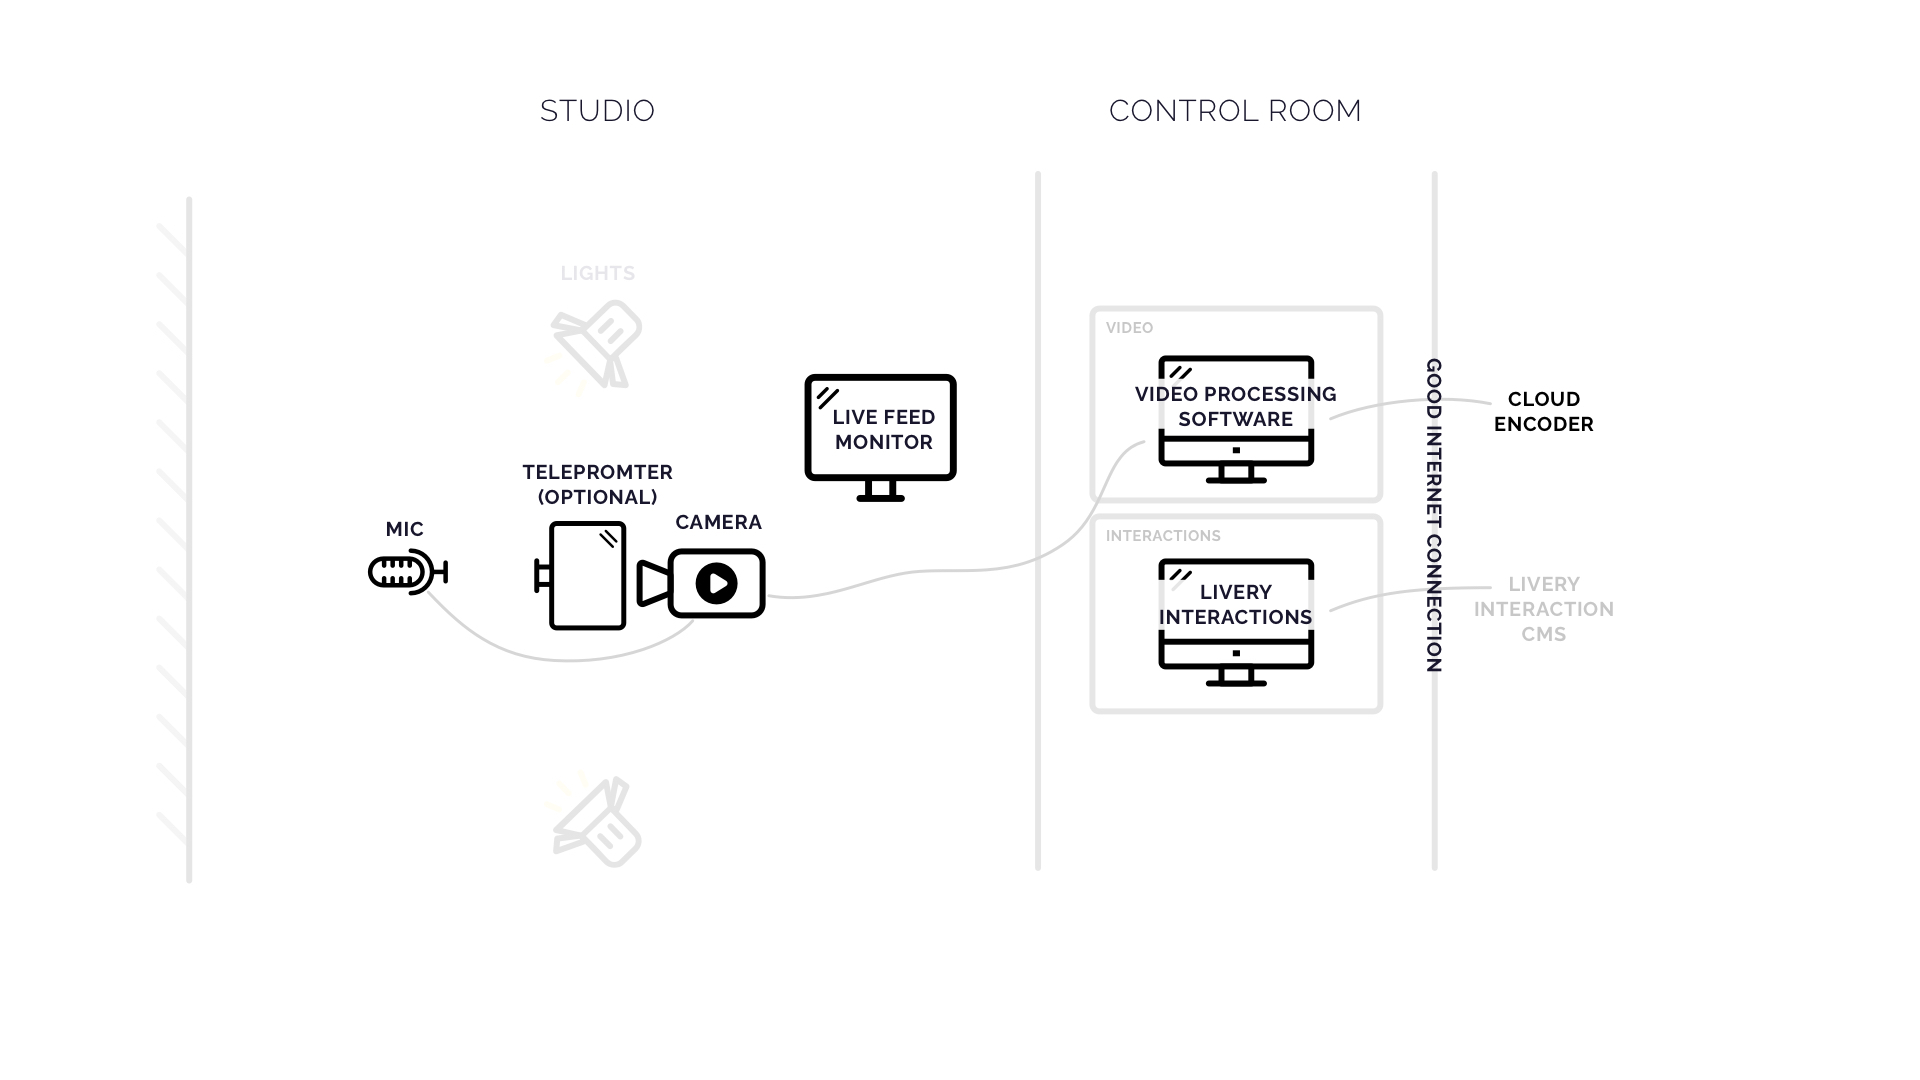
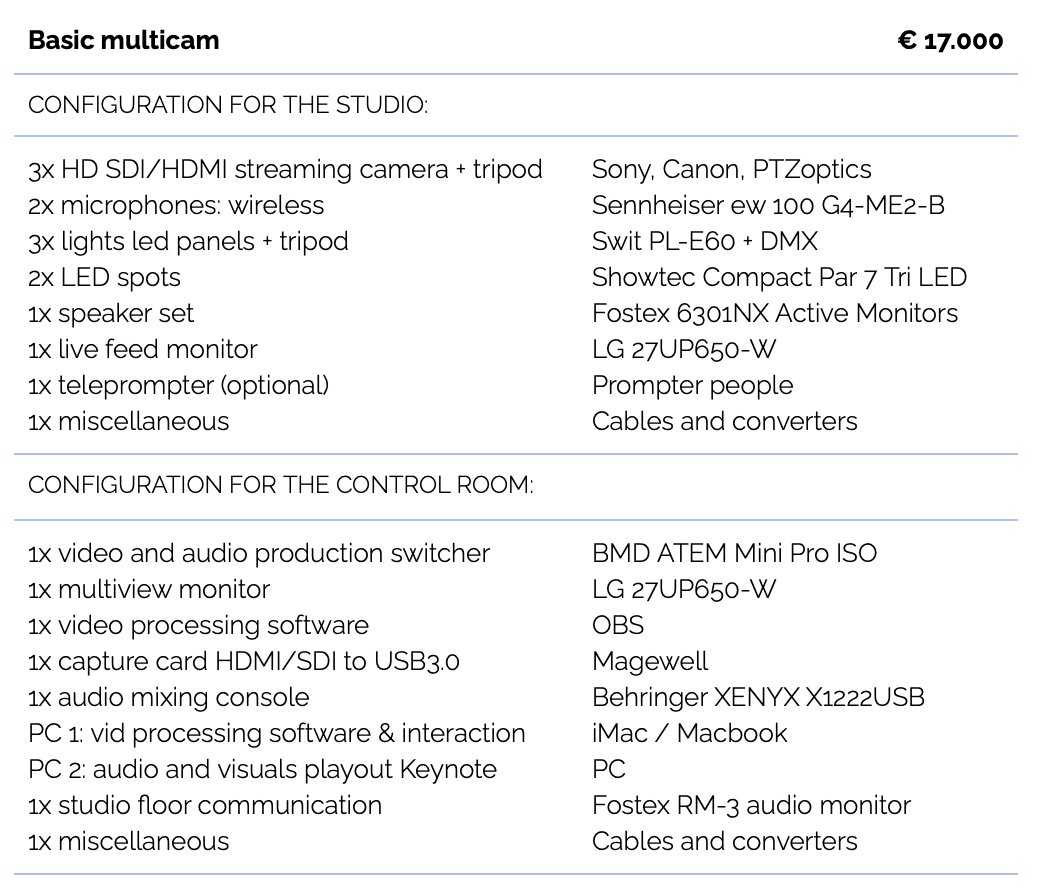
Basic multicam studio
If you’d like to showcase more than one camera angle and switch seamlessly between them live on air, the basic multicam setup may be for you. The configuration (as we’ve recommended it below) is a basic entry-level production setup for multicam productions.
With a medium studio activity commitment (i.e., you’ll need more than one person on set to manage the camera switching), you can host more professional-looking talk shows, basic shoppable and unboxing sessions (switch between a close-up shot on the product, and further back shot with an overview of the studio, for example), workshops, live reporting, and more.
The multi-cam setup increases both production and viewer attention value. This configuration enables you to produce formats with multiple hosts and guests using basic visual playouts.
Use cases for a basic multicam studio
- Studio format with guest
- Workshop
- Unboxing
- Studio and online trivia
- Shoppable magazine
- And more
Click here to see the set up a basic multicam livestream studio
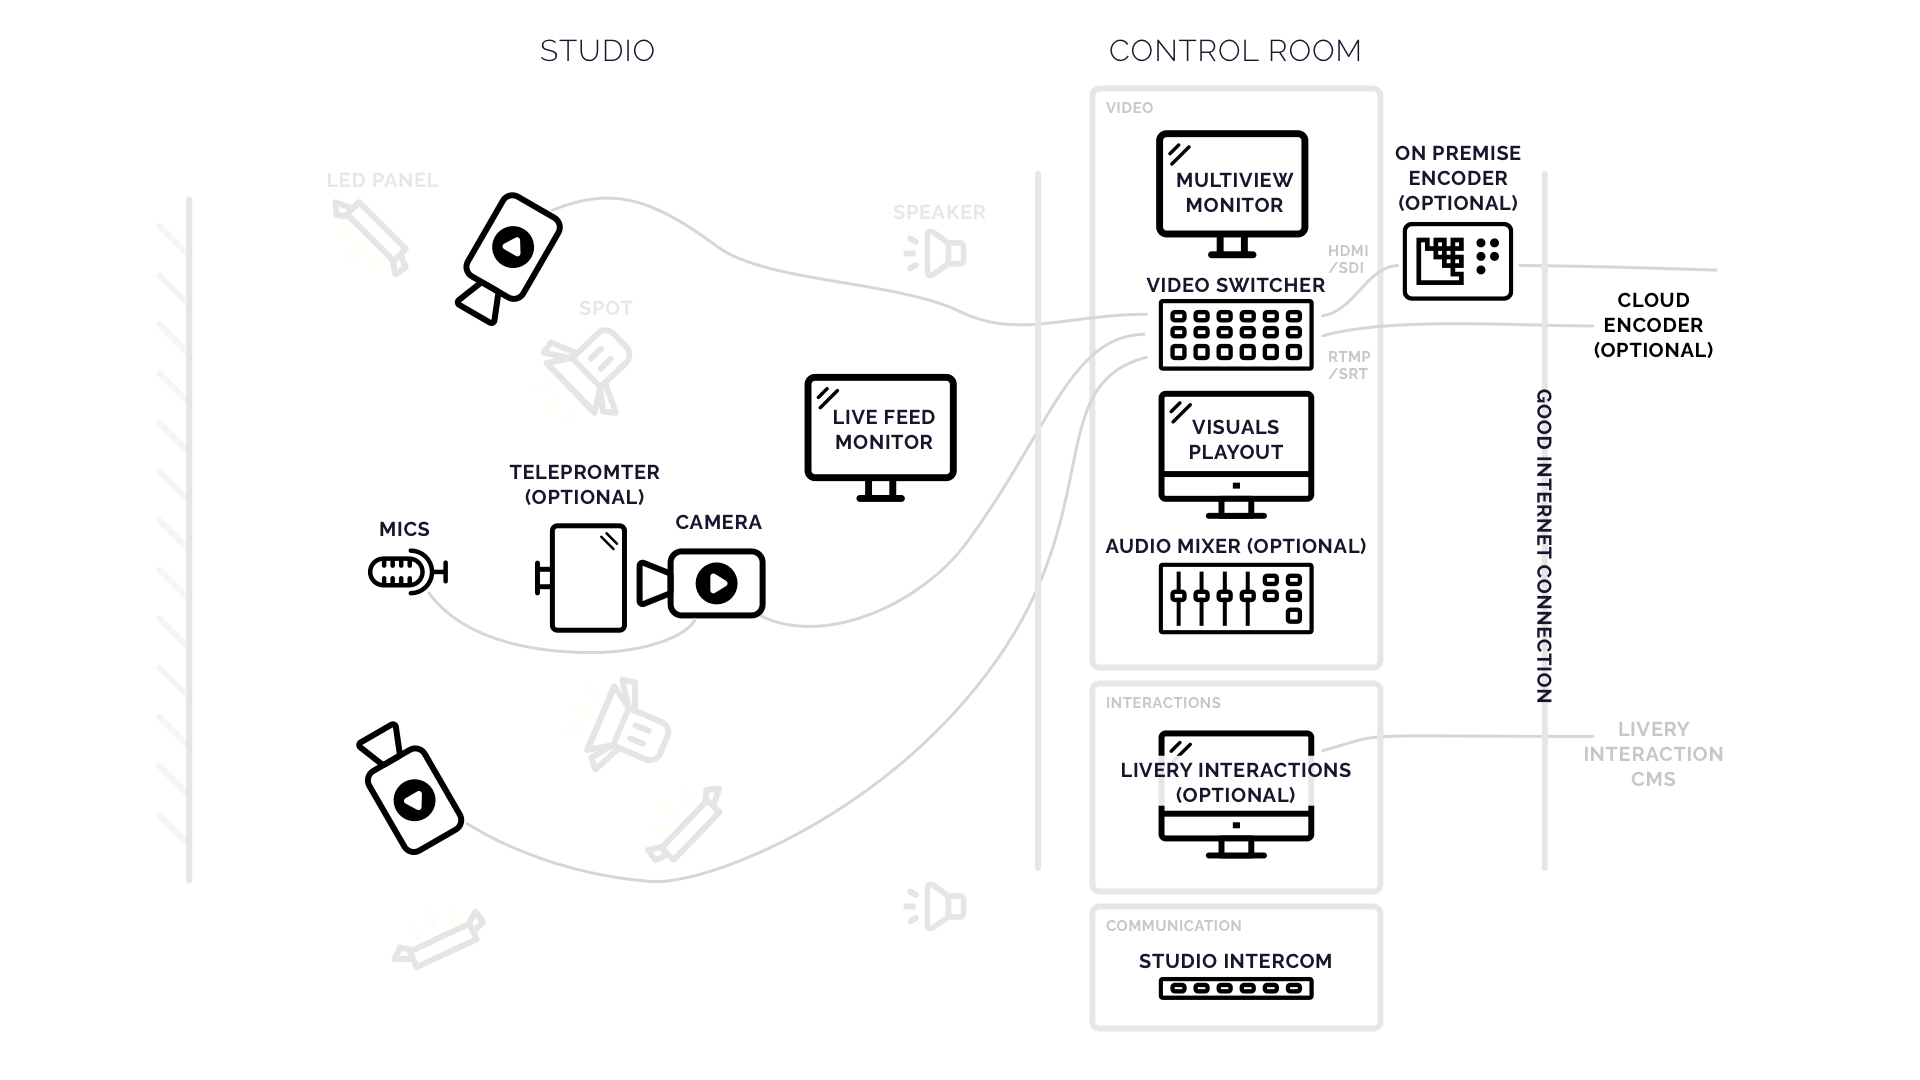
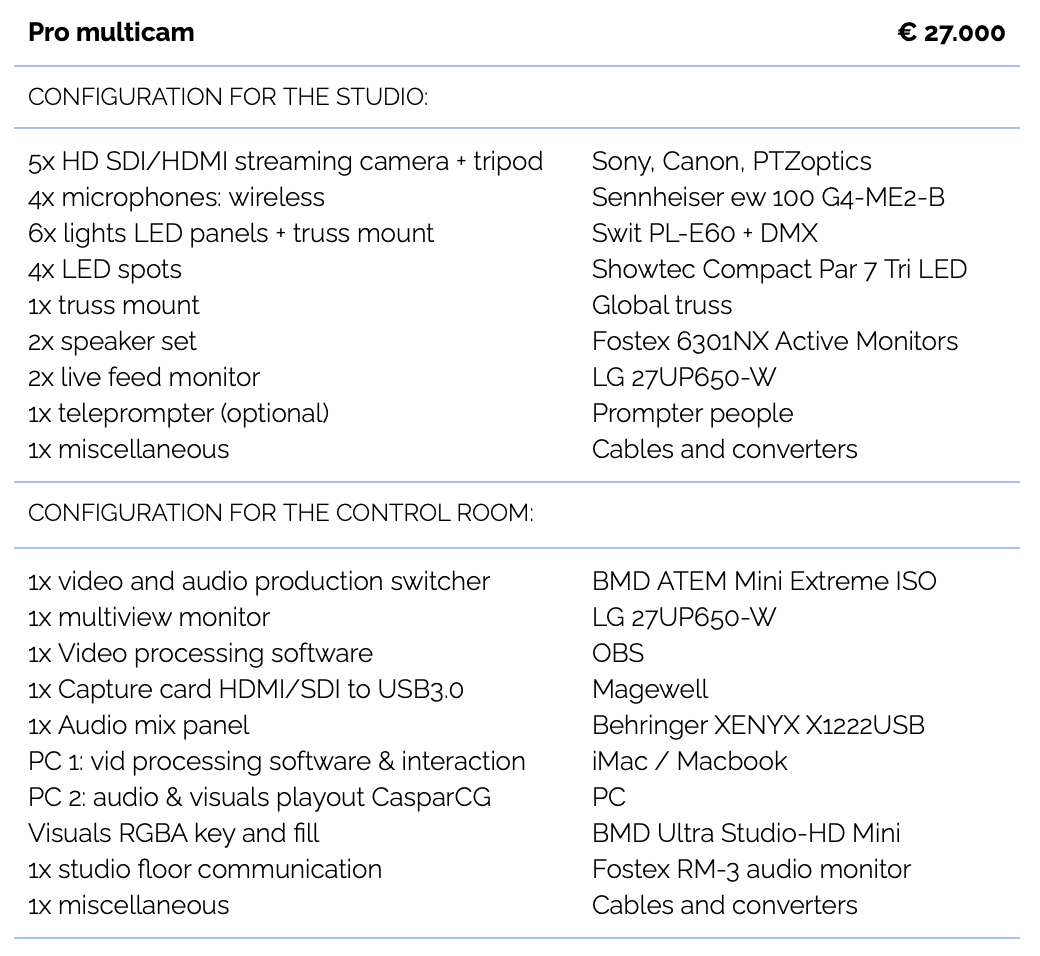
Professional multi-camera (multicam) studio
If you’re new to streaming, we recommend trying a few streams with one of the other configurations before giving the professional multi-camera studio setup a try. A professional production setup allows for medium- to high-value multicam productions, but it takes intensive studio activity.
This configuration enables you to produce content requiring multiple views and attention points. Think of productions with multiple guests or contestants on set, or producing a game show with competing teams in the studio.
Once you’ve gotten your configuration up to this level, Livery recommends using open-source CasperCG for improved visual and audio playout, as its smoother playback will add additional value to your productions.
This platform is used to play out professional graphics, audio and video to multiple outputs as a layer based real-time compositor. It is free and Windows and Linux based. The only investment needed is a decent laptop with a powerful video card.
Use cases for a professional multicam studio
- Studio format with multiple guests
- Game show with studio contestants
- High-intensity formats with multiple products: tell sell, cooking workshops, live sporting events, etc.
- And more
Click here to see the set up a professional multicam livestream studio
Recommended livestream studio configurations
Now that you’ve chosen the setup that’s right for you, here are some of the equipment specifications we recommend to bring it to life.
set up of a mobile livestream studio
set up a single-cam livestream studio
set up a basic multicam livestream studio
set up a professional multicam livestream studio
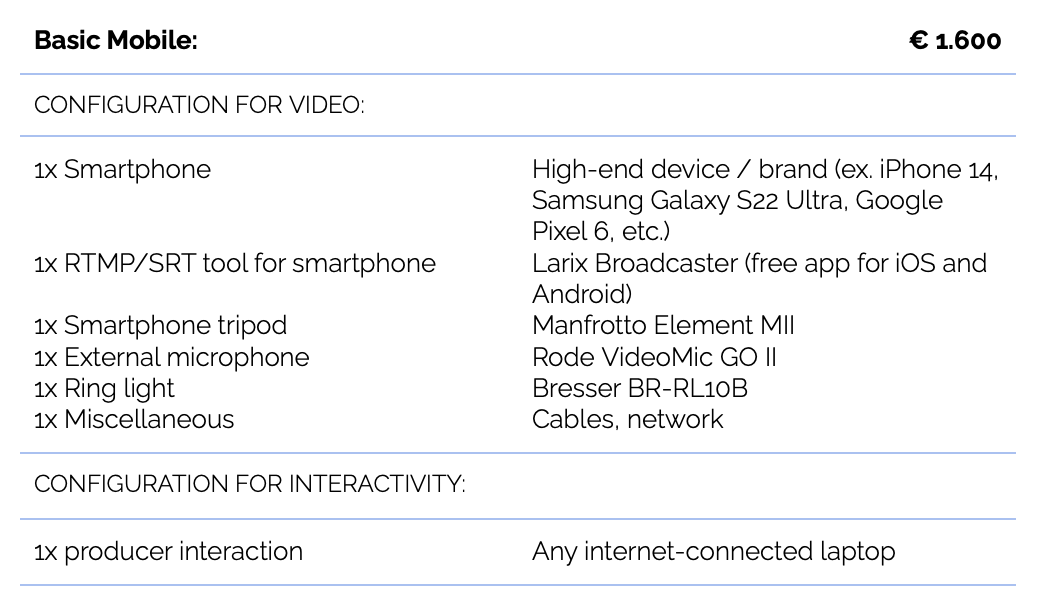
Mobile studio configuration
To set up your mobile studio, you really just need a high-end smartphone with an RTMP/SRT app (more on that in a second). Before we dive into our recommended equipment, here are a few thoughts and considerations to think through:
First, you’ll need a mobile RTMP/SRT tool
You will be streaming from your mobile device over the internet to our cloud encoder. The encoder only accepts RTMP/SRT-based streams, which means you’ll need a tool to convert your camera’s feed into a stream in line with this protocol.
Even though that sounds like a complicated problem, thankfully, there’s a very simple solution. The Larix Broadcaster tool is a free app for iOS and Android that enables your device to do just that. Install it and you are ready to stream to Livery.
Second, you’ll need a 4G network connection and > 5mbps upload speed
Because you are streaming from your mobile device directly to Livery’s cloud encoder, make sure your mobile network or Wi-Fi connection to the internet is strong and stable.
Requirements: 4G or Wi-Fi connection with at least 5mbps upload speed. To check the upload speed on your mobile device, head to “www.speedtest.net” on your mobile phone’s web browser (i.e., the internet browser you use to search on your phone, such as Safari, Firefox, or Chrome).
Third, you may want to consider a microphone
While you can’t change your phone’s internal camera or mic, you can use an external microphone to get better sound. Good sound quality makes a huge difference in the overall viewer experience. Our recommendation is that you use an external instead of your device’s built-in microphone. You can use a clip-on, a shotgun mic, or a table mic – there are microphones made for mobile devices out there for any kind of production.
Now that you understand the basics, if you want to maximize the production value with your mobile device, below are our recommended additions and accessories:
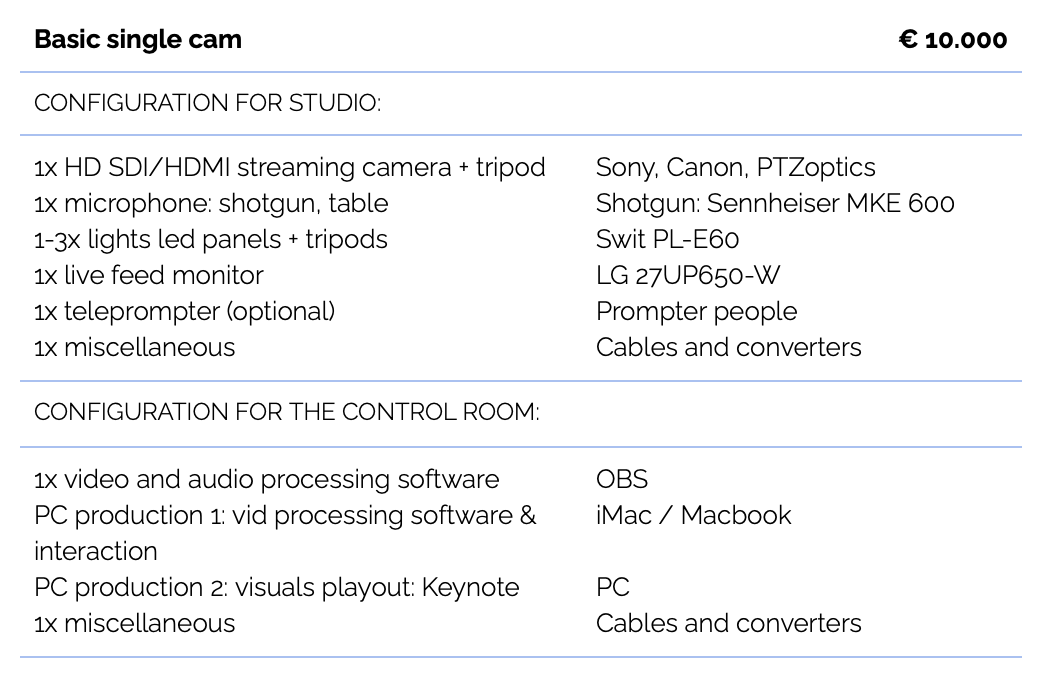
Basic single-cam configuration
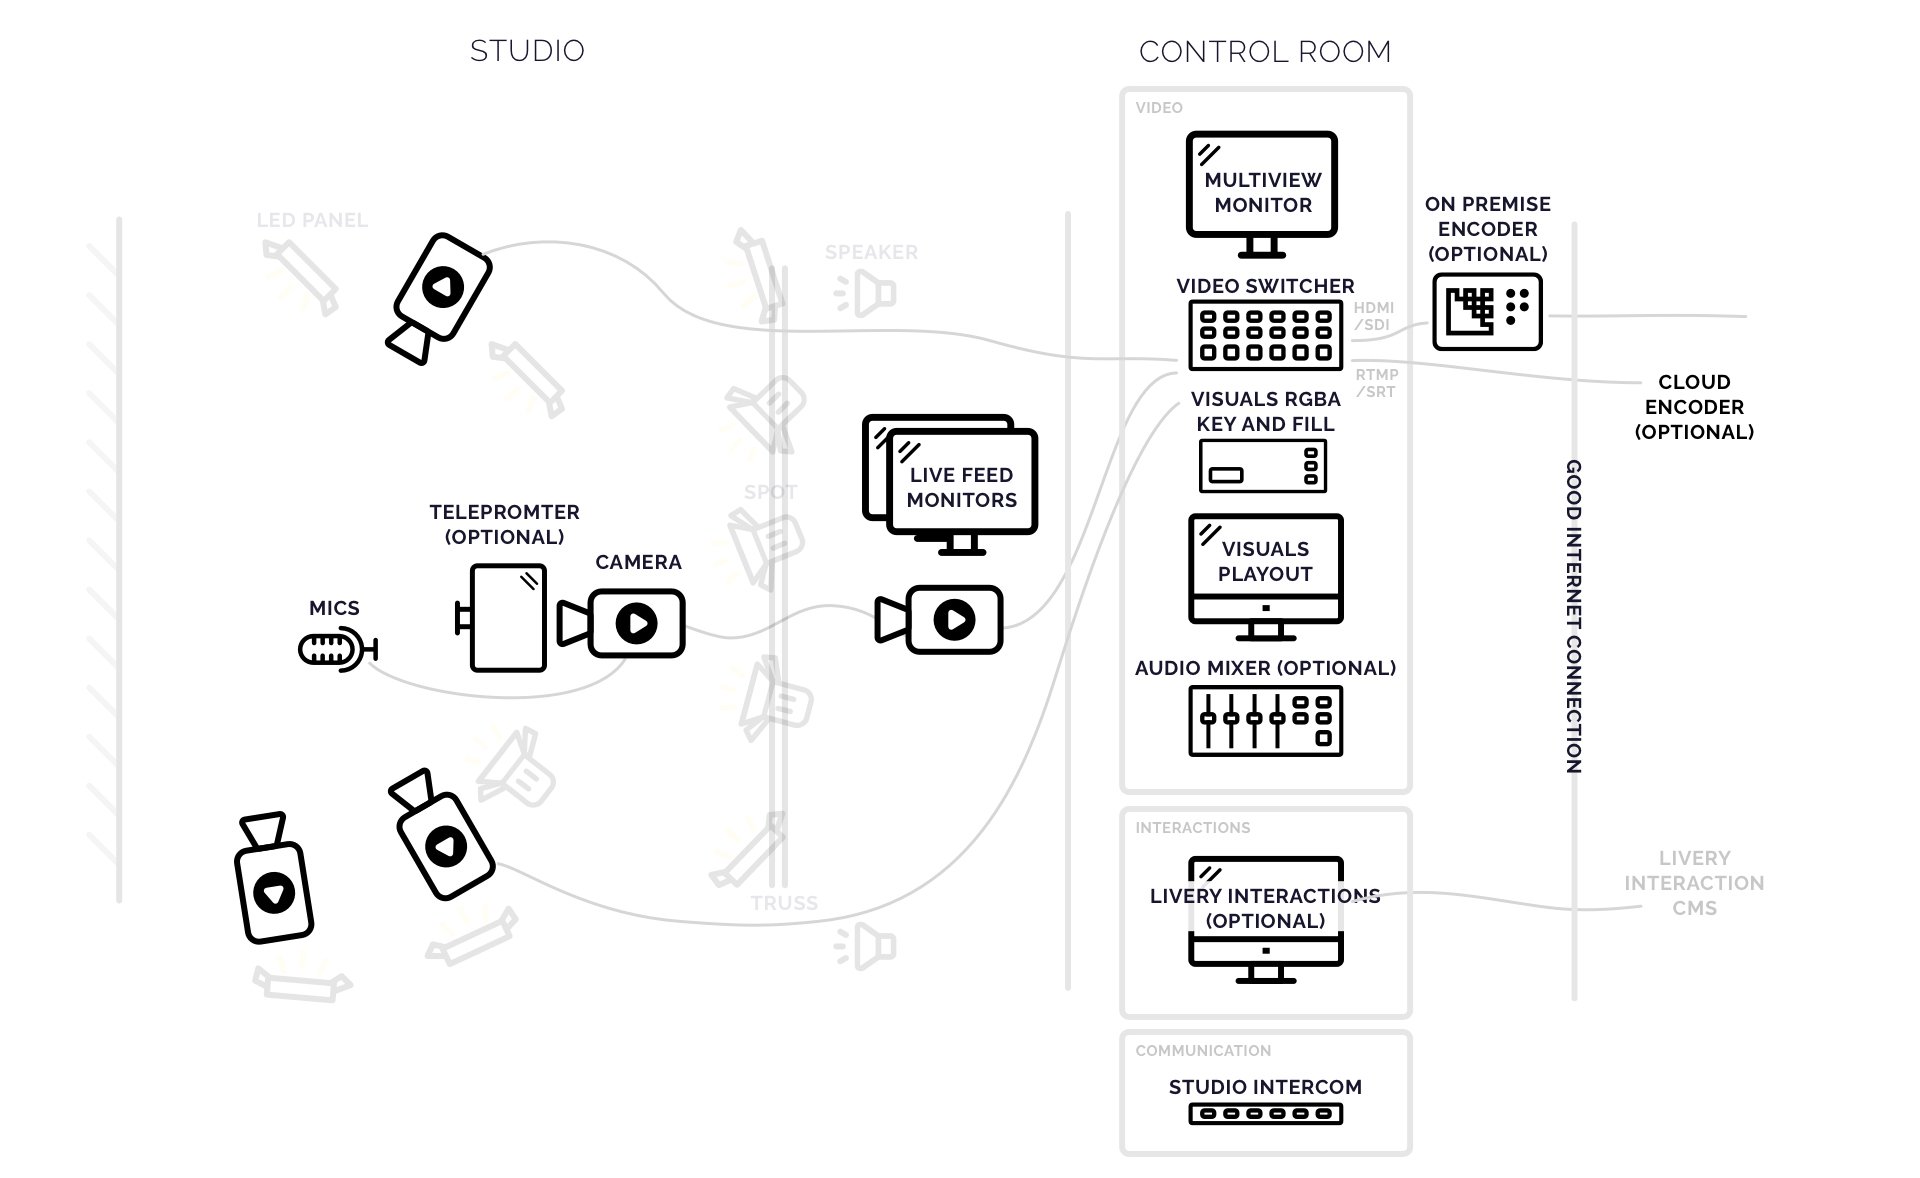
If you’ve opted to go with the basic single-cam studio, here’s what you’ll want to get – broken down into two categories: configuration for the studio (i.e., the part that will be seen by viewers) and the configuration for the control room (i.e., the backend stuff). In this setup, the same person can operate both the studio and the control room if the production is simplistic enough. Though two people would handle it together a bit easier/smoother in the event that camera/mic settings need adjustment.
Here’s what you’ll want for your setup (including recommended brands in the second column):
Basic multicam livestream studio configuration
If you’ve opted to go with the basic multicam studio, here’s what you’ll want to get – broken down into two categories: configuration for the studio (i.e., the part that will be seen by viewers) and the configuration for the control room (i.e., the backend stuff).
Here’s what you’ll want for your setup (including recommended brands in the second column):
Professional multicam studio configuration
If you’ve opted to go with the professional multicam livestream studio, here’s what you’ll want to get – broken down into two categories: configuration for the studio (i.e., the part that will be seen by viewers) and the configuration for the control room (i.e., the backend stuff).
Here’s what you’ll want for your setup (including recommended brands in the second column):
Additional notes and recommendations for your livestream studio
Now that we’ve covered the basics, let’s touch on a few definitions and additional considerations you may want to make for your studio environment.
Recommended encoders: on-prem vs. cloud encoders
As we touched on earlier in the article, the Livery platform uses RTMP/SMT file format. This allows video processed through Livery the ability to seamlessly play back on the widest range of viewer devices. An encoder converts the digital video file into another digital video format for delivery to a decoder. This is a long way of saying that an encoder is an important part of any video streaming setup if you broadcast to medium or large audiences.
There are two types of encoders you can use with Livery. The first is our cloud encoder, which works over the internet on your behalf (i.e., no additional hardware required). The second is an on-site (or on-prem) encoder.
Using an on-prem encoder offers a few benefits, which include the availability of network analytics data and the option to reach a maximum glass-to-glass latency of 1.5 to 2.5 seconds. In other words, it makes your video streams faster (closer to real time for viewers).
If you’re fine with latency between 2.5 and 3 seconds (i.e., a two- to three-second delay between recording and viewing), network analytics data becomes less relevant, and a cloud encoder is a good option for your stream.
There are a few notable exceptions where an on-prem encoder will not be the best choice for your production. You’ll need to use a cloud encoder if your productions use more than 3 streaming (studio) locations (i.e. the stream itself is generated by a network of multiple streaming users). Second, when streaming from a mobile device, cloud encoding is the only option.
Recommended mixers: software and hardware recommendations
A software and/or hardware mixer is often used when you have multiple stream locations or cameras. The mixer allows you to switch seamlessly between video sources. All video sources are connected to the mixer, which controls the active broadcast stream and pushes it to either the cloud or on-prem encoder.
Recommended mixer hardware options
There are many brands out there with great entry-level and high-end professional equipment for your production requirements.
Our recommended lower-budget hardware solution for video processing is the Black Magic Design ATEM series of switchers, ranging from the cheap Mini Pro to the Mini Extreme ISO and the ATEM Television Studio Pro 4K. These switchers are great value for your money and a good starting point for your own research and comparison.
On the higher end of the budget spectrum, we recommend Newtek’s TriCaster Mini Advanced. This machine needs a bigger hardware budget but offers everything you want/need for pro-league streaming productions.
Recommended mixer software options
You can keep your production running smoothly with free software like OBS, or invest a few bucks in digital tools like vMixer or Wirecast.
OBS is an open-source platform and is stable with basic productions with little live processing requirements for visual playout and (chroma key) layering. If you run more complex productions (i.e., productions that require more processing power) we recommend you purchase a license for Wirecast or vMixer.
Recommended cameras for video quality
There are thousands of cameras out there to choose from in all budget ranges. We recommend a camera that has:
- 4K video
- XLR audio input
- SDI output
With that said, here are our recommended cameras:
The standard video cameras in our Livery studios are all 4K camcorders from Sony. The best we have is the Sony PXW-Z 150, which does a great job as a fixed camera in our studio. We can also use it for streaming and recording on location. The camera has a XLR-audio input which, as we mentioned, we prefer as video and audio from the mic are processed at the source (camera) and completely in sync. It also has an SDI output (which we prefer over HDMI).
This camera costs about €3.000 (or $3,000) so it’s a serious investment when setting up a studio from scratch, but in our opinion, it is worth it if you plan to stream regularly.
The PTZ-20X-SDI is a new set of cameras we are currently checking out. These are PTZ (pan-tilt-zoom) cameras, which can be operated and controlled centrally from a remote location using a remote joystick controller, browser or software application like Wirecast or OBS. It will open up new opportunities for low-cost ultra-low latency live streaming. We keep you posted on our recommendations.
Recommended mics for sound quality
For microphones, we generally turn to the Sennheiser wireless mic sets. These sets are professional, robust, and easy to set up and use.
- For wireless, we choose the Sennheiser ew 100 G4-ME2-B set.
- For directional-shotgun microphones we choose the MKE 600.
- With interview settings, table mics are a good alternative to the wireless and shotgun mics.
Recommended teleprompter
The production setups presented here are all configurations based on live ultra-low latency video streaming. This means you, as the host, are giving a live production.
In our experience with running live productions, if you have more than one person in the studio (recommended for all configurations beyond mobile), we highly recommend a teleprompter. A teleprompter can both run the presenter’s scripts and offer a subtle means to communicate directly with the host while they’re live on air. When using Livery Interactive, this screen can also feed in and display real-time results from any interactions shown to the audience.
As far as brand recommendations go, the teleprompters from Prompter People are excellent.
How much will it cost all things considered?
After reading through this article, you can probably see both how custom you can make your studio, and how quickly things may start to add up. To help you plan the full business costs, check out our business cost calculator*. Just want to see what Livery costs for your situation? Check our price configurator.
*NOTE: There are two tabs in this spreadsheet – one for mobile configurations, and the other for camera-based setups.